Tote Bag Makeover
Tissue Paper Decoupage, Gold Leaf Stenciling & Full Prep Guide
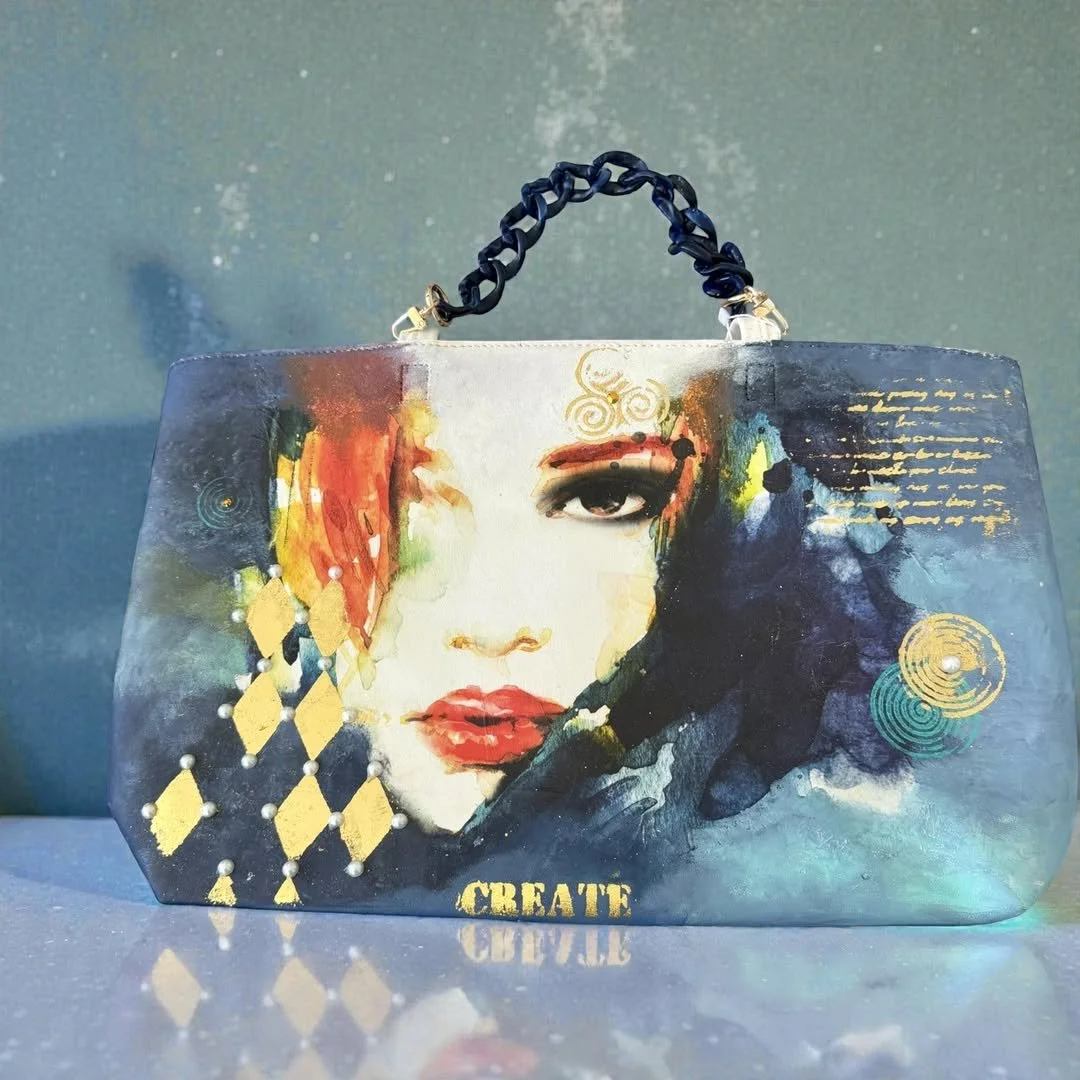
This step-by-step purse makeover tutorial shows you how to transform an inexpensive pleather tote bag from Amazon into a mixed media art piece that looks like it was hand-painted by a professional. The centerpiece is a stunning face print on tissue paper from Zazzle — and the techniques used to apply it, blend it, and embellish it are what make this project stand apart from a typical decoupage project.
The tutorial starts with the 3-step prep process that prevents every purse fail: first, wipe down the bag with acetone nail polish remover to strip the factory finish; second, lightly scuff the surface with a fine sanding block or nail buffer to give it tooth; and third, apply Dixie Belle Clear Bonding Boss as a bonding primer. A sealer is not a bonding primer — and this tutorial explains why that distinction matters and what happens when you skip this step (spoiler: everything peels right off).
The tissue paper application is where the magic happens. You'll learn to iron wrinkled tissue between parchment paper sheets to start with a perfectly smooth surface, tear away all straight edges so seams disappear into the background, and apply the thinnest possible layer of Mod Podge Multi to prevent wrinkles. The key takeaway is that less decoupage medium equals better results on delicate paper — the opposite of what most people assume.
The full color-matching and blending process uses Payne's gray, DecoArt lamp black, a gorgeous teal called Sea Breeze, orange-red, brown, antique gold, and white. Rather than pulling paint in long strokes, you'll see the pouncing and finger-tapping technique that eliminates brush marks and makes the painted background look like it was printed on the bag. Tapping with your finger blends two colors together without leaving a hard contrast line — and it's the single most useful technique in the whole tutorial.
The finishing touches take the bag from beautiful to extraordinary: gold leaf applied through a harlequin diamond stencil using gilding adhesive, decorative French script stamps pressed directly with thick acrylic paint (no ink pad needed), stenciled words like "Create," and pearl accents. There's also an honest lesson learned live on camera — don't apply gold leaf immediately after using a heat gun, because the heat can melt the gold. Let it cool first.
The tutorial also covers swapping out the original white handles for navy chain handles from Amazon, using deli sheets to press tissue paper smooth, and how to create custom colors from your existing palette using basic color wheel knowledge instead of buying new bottles. Whether this is your first purse project or your tenth, the prep tips alone are worth the watch.
Supply List
Some links may be affiliate links — thank you for supporting Studio MDAZ!
The Bag
Pleather Tote Bag — https://amzn.to/4x43PYQ ($24.99 — nice size, has a pocket, pleather cleans easier than canvas)
Replacement Chain Handles — Amazon (navy blue acrylic chain, ~$9.99)
Decoupage Paper
Beautiful Face Furniture Decoupage Tissue Paper — Zazzle (ultra-thin tissue — feels like a single-ply napkin; available in multiple sizes)
Prep & Adhesives
Dixie Belle Clear Bonding Boss — https://amzn.to/4u4vw0G (bonding primer — use clear to keep the bag's original white; also available from Deborah Bucher Designs)
Acetone Nail Polish Remover (any drugstore — 99 cents at Walgreens; strips the factory finish)
Mod Podge Multi (all-in-one formula — thinner than regular Mod Podge, won't rip delicate paper)
Fine sanding block or nail buffer (for scuffing the surface after acetone)
Gold Leaf & Stencils
Gold Leaf Gilding Kit — https://amzn.to/3PV5ejv (includes gilding adhesive + gold leaf varnish; also available on Temu in multiple colors)
Harlequin / Diamond Stencil — https://amzn.to/3RDuJGF
Stamps
Decorative Word & Script Stamps (2 sets) — https://amzn.to/4dFOhTu (use with thick acrylic paint — no ink pad needed)
Paint
Payne's Gray (deep navy base color)
DecoArt Lamp Black
White acrylic
Teal — Sea Breeze (the teal is critical for blending into the print's colors)
Orange, Brown, Antique Gold (match to the face print's warm tones)
Master's Touch thick acrylic paints (vivid colors — buy on sale; used for stamping)
Tools & Extras
Large soft brush (for initial color blending)
Scruffy / worn brush (for pouncing technique — better than a clean brush)
Small stencil brush (for stenciled words and gold leaf application)
Deli sheets (for pressing tissue paper smooth during application)
Parchment paper (top and bottom for ironing tissue paper wrinkles)
Iron (low heat, between parchment — removes creases from stored tissue paper)
Heat gun (for drying — but let surfaces cool before gold leafing!)
Ziploc bag or similar (for pressing out wrinkles during application)