How to Paint & Bedazzle a Patriotic Tote Bag for Under $15
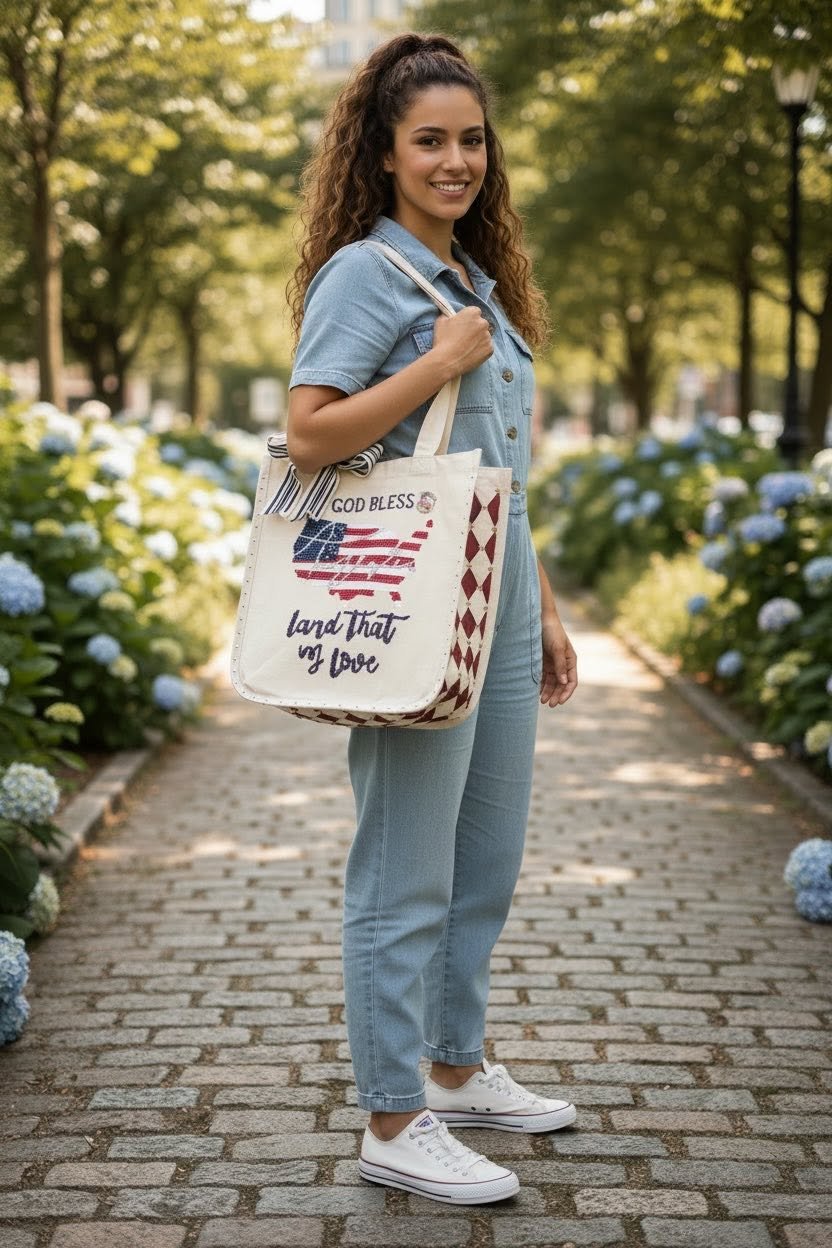
There's something about a patriotic project that just gets me, and this painted and bedazzled God Bless America tote bag might be one of my favorites. The whole thing starts with a giant canvas tote from Hobby Lobby — we're talking $3.99, with pockets, and big enough to use as a grocery bag all summer long. The stencil for the USA flag silhouette and "God Bless America" text came from Amazon for $9.99, and between those two supplies, you've already got a project that's going to stop people in their tracks.
Before a single drop of paint hits the canvas, you have to prep your bag — and this is the step most people skip that makes all the difference. First, coat the entire bag in Dixie Belle Bonding Boss Clear (or Dixie Belle Clear Coat Satin if you want one product that handles both priming and sealing). This step locks down all the fabric fibers so your paint sits on top of the canvas instead of seeping straight through. Once it dries, the bag gets stiff — which is totally normal and expected. That's when you grab a sanding block or a nail buffer and lightly sand the whole surface until it feels soft and pliable again. Finish with a quick swipe of a baby wipe to remove any dust. Now your bag is ready to paint.
Pro Tip
Always keep a piece of cardboard or plastic inside your tote while you work. It prevents paint and glue from seeping through to the back panel and sticking the layers together. An old piece of plastic wrap or a scrap of cardboard works perfectly.
For the flag silhouette, we're using DecoArt Navy Blue with just a touch of black mixed in — the black deepens the navy so it reads as rich and true rather than that bright royal-blue-out-of-the-bottle look. A small stencil brush and a dry-brush technique keeps the paint from bleeding under the stencil edges. The stars get a little extra white to make them pop. While the stencil is still taped in place (don't lift it yet!), we use the same stencil as our guide for the freehand red and white stripes below. Red is one of the most transparent paint colors out there, so mix a tiny bit of black into your Santa Red every time you load your brush — it gives you that deep, saturated patriotic red instead of something that looks pink against the white canvas.
For the "land that I love" lettering, we use a tracing paper + transfer paper technique that takes the guesswork completely out of the equation. Trace the letters from your source onto tracing paper with a pencil, lay yellow transfer/graphite paper on your white-painted area with the shiny side down, tape your tracing on top, and press firmly over each letter with a pen. Lift it up and you've got a perfect outline to paint over. This works for any lettering, any saying, anything you can print from the internet — don't let fancy hand lettering intimidate you when there's a perfectly good workaround.
Lettering Tip
Choose yellow or a light color transfer paper so you can see your lines without them being harsh against your paint. A pen gives more consistent pressure through the tracing than a pencil does.
Once the paint is completely dry, the rhinestone magic begins. Use Gem Tac glue loaded into a syringe for precision application — the Gem Tac bottle on its own doesn't give you the control you need for individual stones. Apply a small amount of glue, set your stones with a wax rhinestone pencil or pickup tool, and work in small sections so the glue doesn't dry out before you can place the stones. We used Crystal AB 4mm stones for the "America" lettering, 3mm Light Siam for the red flag stripes, and 3mm Navy for the blue lettering — all sizes that give great coverage without overwhelming the design.
When the glue is fully cured, go over every rhinestoned area with a thin layer of diamond sealer applied with a small brush. The sealer wicks down between the stones and holds everything in place permanently — we're talking tote bag life, not just one season of use. This step is non-negotiable for anything you're wearing or carrying. Seal everything.
The finished bag is a full patriotic showstopper: painted flag, hand-lettered text done two different ways, glittering rhinestones catching the light, and a cross stencil on the back for a sweet, personal touch. And it all started with a $3.99 tote and about $10 in supplies. You've got this.
Supply List
Some links may be affiliate links — thank you for supporting Studio MDAZ!
🎨 Paint
DecoArt Santa Red
Mix with a touch of black to deepen the color — red is naturally transparent on canvas
DecoArt Navy Blue
Mix with a touch of black for a richer, truer patriotic navy
DecoArt Black
DecoArt White
💎 Rhinestones
Crystal AB 4mm rhinestones
Used for "America" lettering — 4mm is the sweet spot for visibility and coverage
Navy Blue 3mm rhinestones
Used for the navy lettering on the bag
Light Siam 3mm rhinestones
Used for the red stripe areas — a sparkly complement to the Santa Red paint
🛍️ The Bag & Stencil
Canvas Tote Bag — Hobby Lobby Just $3.99! Great size with lots of pockets. Go grab several while you're there.
God Bless America Stencil $9.99 on Amazon — includes the USA map silhouette and lettering Shop →
Bedazzled T-Shirt (as seen in the video) $9.99 on Amazon — runs large, order down a size Shop →
🧴 Prep & Sealing
Dixie Belle Bonding Boss Clear
Canvas primer — coats the fibers so paint sits on top. Use Clear Coat Satin if you want a one-product primer + sealer combo.
Diamond Sealer + Small Brush
Locks rhinestones in permanently after the Gem Tac dries
Gem Tac Glue
Best for rhinestones on fabric — dries completely clear
🖌️ Tools & Extras
Tracing paper + yellow transfer/graphite paper
Sanding block or nail buffer (to soften the bag after priming)
Small stencil brush (for flag detail work)
Short flat square brush (for the red and white stripes)
Wax rhinestone pencil or pickup tool
Syringe (for Gem Tac precision application)
Cardboard or plastic insert for the bag interior
Baby wipe (to dust off the bag after sanding)