How to Color Blend & Decoupage a Decorative Tray
with Rice Paper + UV Resin Finishing
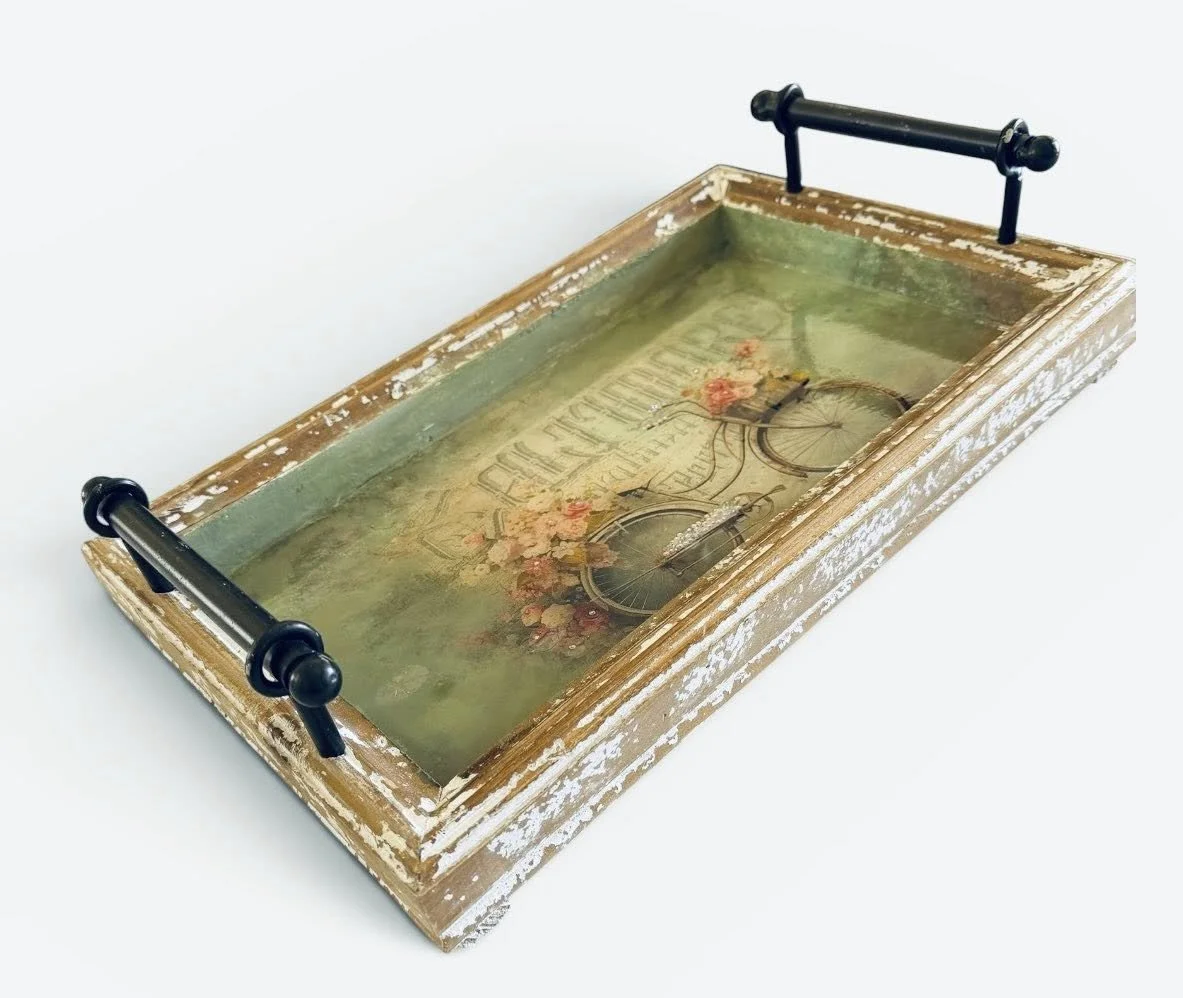
In this detailed and technique-packed tutorial, Debi from Studio Mdaz walks you step by step through transforming a plain Hobby Lobby tray into a stunning summer showpiece using a gorgeous bicycle-themed rice paper from Vintage Retail Therapy, acrylic paints, rhinestones, and UV resin — and the color blending lesson at the heart of this tutorial is one of the most requested skills in her community.
You'll start by learning why rice paper behaves differently from napkins and regular decoupage paper, and how to feather the edges by ripping or wetting with a brush rather than cutting, so there's no hard line where the paper ends. Then Debi walks you through her foolproof wrinkle-free decoupage method — thin coats, a little at a time, using a deli sheet or plastic bag to smooth everything down, and why you never apply the top coat until the bottom coat has fully soaked in. A quick pass with a mini gator sander knocks the paper edge ridge completely flat before any color blending begins.
The color blending section is where this tutorial truly shines. Debi shows you exactly how she identifies the colors in a piece of paper — how to hold paint bottles directly up to the design to test for matches, why what looks like brown is often actually rust, and how to find that unexpected teal or peach tone hiding in the background. You'll watch her build up layers using a pouncing technique with a stencil brush, blend with water and her finger for a seamlessly soft edge, and keep working until you genuinely cannot tell where the paper ends and the painted tray begins.
From there, Debi demonstrates rhinestone bedazzling directly on the decoupaged surface — adding 2mm crystal AB rhinestones to flower centers and along the bike's chain guard using Gem Tac glue loaded into a precision syringe tip, and showing exactly why white glue (Gem Tac) is sometimes easier to work with than clear (T8000) when you need to see placement. The tray is then sealed with Liquitex High Gloss Varnish before the grand finale: a UV resin pour that levels over all the rhinestones and paper for a perfectly flat, glass-like finish — cured entirely in direct sunlight in about 20 minutes, no UV lamp required.
Debi also shares her new favorite hack for paint bottles — squeeze bottle tips from Amazon that fit any standard acrylic bottle and give you the same controlled flow as an Elmer's glue bottle, eliminating the mess of squeezing out too much paint at once.
🛒 Supply List
Some links may be affiliate links — thank you for supporting Studio MDAZ!
The Tray
Decorative tray with handles and feet — Hobby Lobby, ~$17.99 (check for 40% off coupons)
Decoupage Paper
Bicycle rice paper — vintageretailtherapy.com (use code SISTERHOOD for a discount)
Deli sheets or plastic Ziploc bag (for smoothing paper without wrinkles)
Decoupage Medium
Mod Podge Multi — gloss finish (Debi's go-to for all decoupage)
Large soft brush (for thin, even coats)
Sanding
Mini gator/orbital sander or emery board (for feathering paper edges)
Color Blending Paints
Acrylic paints in colors pulled from your paper — Debi used: rust, two greens (light and dark), light tan, peach, burnt umber/dark brown, robin's egg teal
Stencil brush (for pouncing technique)
Water (key blending tool — used with finger)
Paper towels
Rhinestone Bedazzling
Rhinestones — 2mm Crystal AB (SS8 size)
Gem Tac Glue — requires precision syringe tip for application
Syringes with precision tips (for Gem Tac)
T8000 clear adhesive (alternative to Gem Tac — clear, harder to see placement)
Paint Bottle Tips
Squeeze bottle tops — fits standard acrylic paint bottles, 36-pack (Amazon); gives Elmer's-style controlled flow
Sealing
Liquitex High Gloss Varnish (brush-on sealer before resin)
Soft brush for sealer application
Resin Finishing
Kisrel UV Resin — crystal clear, hard cure; kit includes everything needed
Silicone spreading tool (optional, for pushing resin into corners)
Heat gun (to pop any bubbles after pouring)
Direct sunlight — cure time approximately 20 minutes outdoors (no UV lamp needed!)