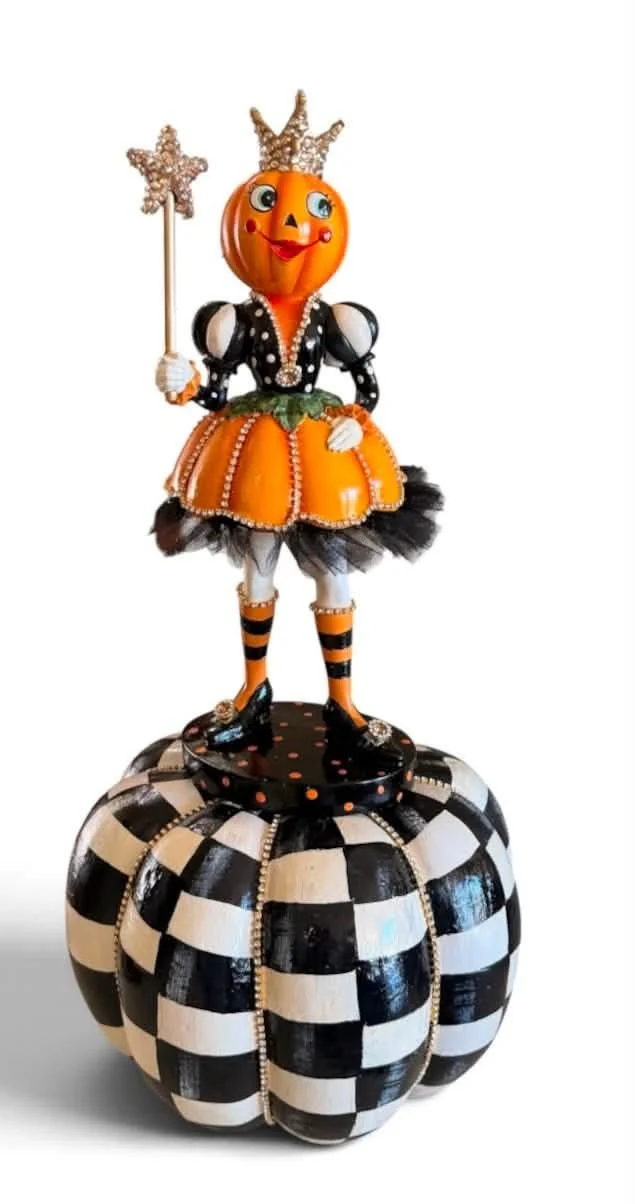
How to Check a Pumpkin from Scratch
Black & White Tutorial + the Fix Nobody Will Notice
That random thrift-store piece you keep passing over might be exactly what your next project needs.
This tutorial is a complete start-to-finish guide for checking a pumpkin — and the figurine topper takes it from a nice fall decoration to a conversation piece that looks like it cost ten times what you paid.
The first thing to know is that your pumpkin needs an even number of ribs. Since every other rib section alternates black and white, an odd number means two same-colored sections will end up next to each other. Look for a pumpkin with 6, 8, or 10 ribs. This one has 8. If you want to do diamonds instead of checks, rib count doesn't matter — but for diamonds, you want taller, thinner ribs.
If you're starting with an orange pumpkin, the prep is non-negotiable: Dixie Belle Bonding Boss in gray as a stain-blocking primer. Here's the thing most people don't realize — the orange dye doesn't bleed through your paint. It bleeds through your sealer. So you can paint it white, look at it, think it's perfect, and then the moment you seal it, the orange comes right through. A stain-blocking bonding primer prevents that entirely. If you start with a cream or white pumpkin, you can skip this step and go straight to checking.
The layout technique is straightforward: draw a pencil line down every rib, then down the center of every rib. That gives you your vertical lines. For horizontals, find center, then use a flexible ruler (Walmart) to mark 1-inch increments all the way around. One-inch checks are the sweet spot for most pumpkins — half-inch gets tedious, and anything bigger loses the look. Once all your lines are in, mark every other box with a dot so you don't accidentally paint two side by side (it happens, even on camera).
The painting uses DecoArt Americana Lamp Black — the one-and-done paint that never needs a second coat. When you're doing a million tiny checks on a pumpkin, the last thing you want is going back over every single one twice. Always offload your paint in the center of the check first (never on the line), then line your brush up in a corner and push straight down. The brush does the work — short, firm bristles with a flat edge give you control without needing a steady hand.
The best tip in the whole tutorial is the fix for a jerked line. If you accidentally pull your brush into the white area, don't repaint it. Instead, just make that check slightly bigger on the side where you jerked. It straightens the line, and nobody will ever know you fixed anything. They would notice the jerk — they will never notice the fix.
The figurine is a $12.99 pumpkin girl from Marshalls, set right on top of the pumpkin (no glue needed — she sits perfectly). She gets 2.5mm gold bling trim along her dress hemline, shoes, socks, crown, and wand, plus 4mm BeadsLand crystal champagne rhinestones on her crown for sparkle. The tutorial also covers the difference between resin/jelly rhinestones and crystal/glass rhinestones (crystal has more sparkle and a metal-backed bottom), and why the $5 wax picker pencils outperform every other tool for placing them.
Supply List
Some links may be affiliate links — thank you for supporting Studio MDAZ!
Pumpkin & Figurine
Pumpkin — thrifted (Goodwill, Savers; look for even number of ribs; cream/white to skip priming)
Pumpkin Girl figurine — Marshalls, $12.99 (flat-bottom figurines sit perfectly on flat pumpkins)
Prep
Dixie Belle Bonding Boss — Gray (stain-blocking bonding primer; REQUIRED on orange pumpkins — dye bleeds through sealer, not paint)
White base coat — 2–3 coats
Paint
DecoArt Americana Lamp Black (one and done — never needs a second coat; nothing else compares for check coverage)
Bling
2.5mm Gold Bling Trim — Amazon (for figurine dress, shoes, crown, wand, socks)
4mm BeadsLand Crystal Champagne Rhinestones — Amazon (crystal/glass preferred over resin; 1,400 per pack ~$5.99–6.99)
Adhesive
T8000 (or GemTac, E8000, B7000 — any precision adhesive)
Brushes & Tools
Dynasty brushes — short, fat, flat, firm (sizes 2, 4, 6, 8 + pencil + shipping = $33 from Studio Mdaz)
Flexible ruler — Walmart (bends around curved pumpkin surface for horizontal marks)
Pencil (for all layout lines — sketch lightly on cream, heavier on white-over-black)
Wax picker pencils — Amazon (~$5–7 for 10; sharpen with manual sharpener; all wax, lasts forever)
Rhinestone tray with divots (shake to flip stones upright)
Paint nozzle lids — Amazon (24 for ~$10)