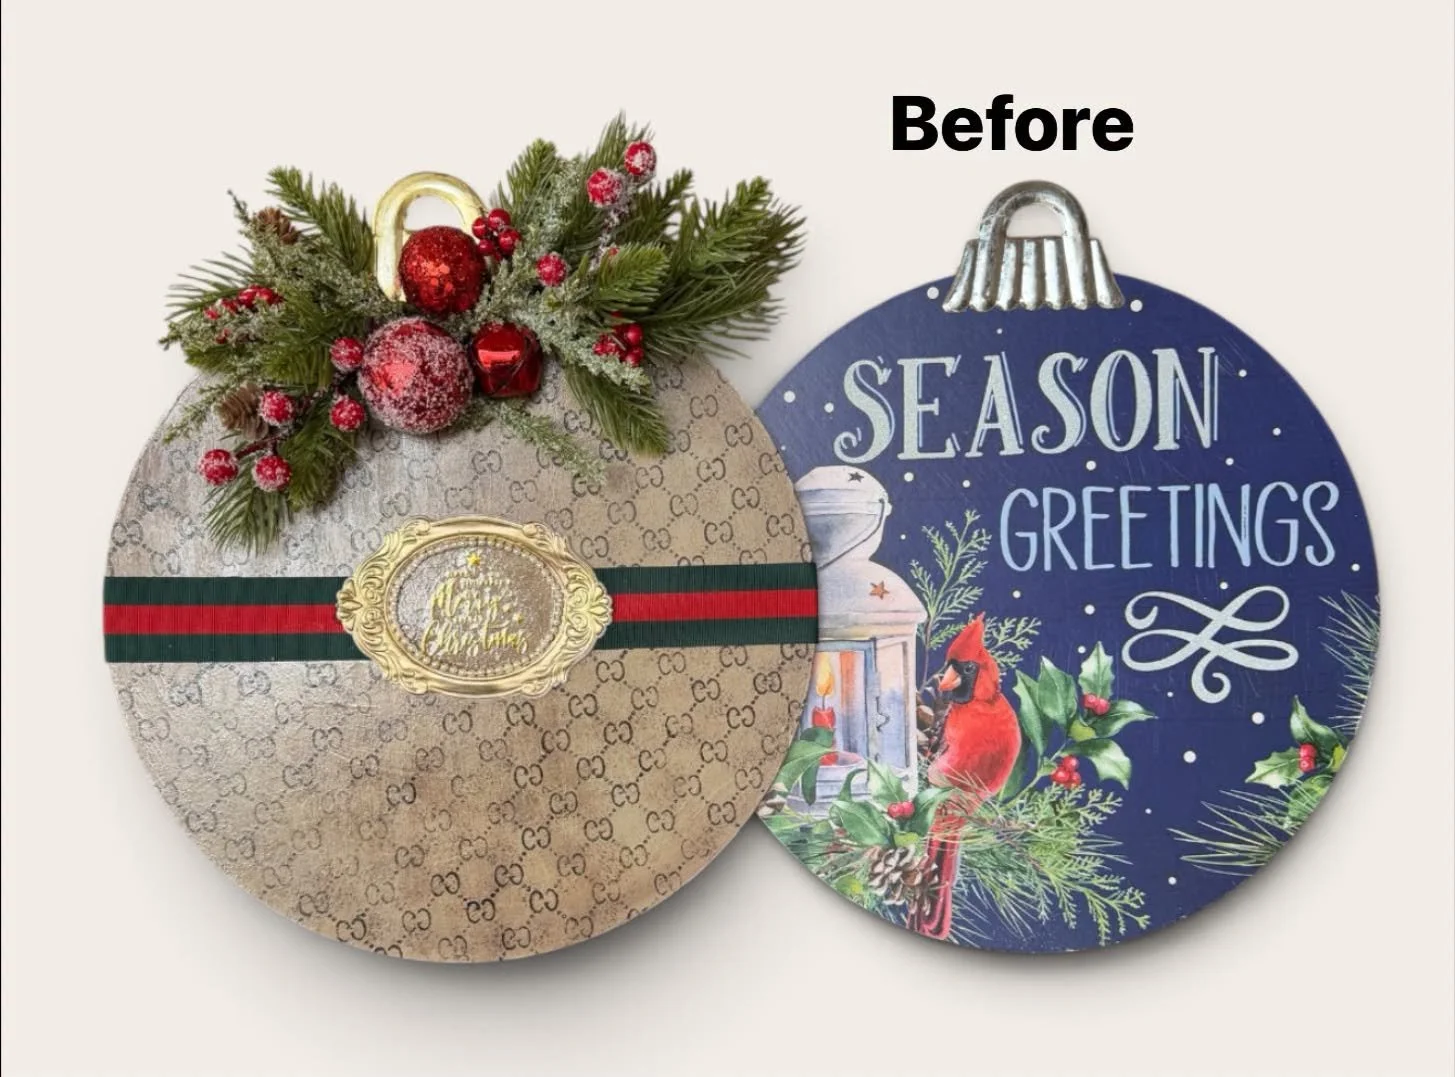
Debi doesn't do many Dollar Tree projects, but when she does, the goal is always the same: it should never look like it came from the Dollar Tree. This week's base was a $1.25 wood ornament hanger, glitter and all. "Very, very rare that I do a Dollar Tree project, but our projects are never gonna look like it came from the Dollar Tree." It's a smaller version of a project she did a few years ago on a $6.99 Hobby Lobby ornament that went viral with tens of thousands of views — and she liked the smaller size even better this time around, since it made the whole project more manageable.
Getting the glitter off and the bones ready
Step one with any glittered Dollar Tree piece: sand it off. "So you're going to sand all of that glitter off." A small sanding block did the job in minutes. From there, a wipe-down and a stain-blocking bonding primer are non-negotiable, especially over anything with saturated color underneath. "Look at the red in the cardinal, look at the blue, and know that it will come through your paint. So you need a stain blocking bonding primer."
And the ornament hangers themselves are worth stocking up on — even past this one project. "You can double layer them, put some really cute paper. You could decoupage behind it. You're still gonna need to bond and prime it, but look, just so many cute things you can do with these."
Faking a designer fabric look with paint
To mimic the look of designer logo fabric, the base coat started with a plain tan, then got stippled with burnt umber using an almost-dry stencil brush, building up the mottled texture a real fabric print would have. A touch of black mixed into the burnt umber deepened it further — a step she called critical to getting the color right. Once the background passed muster, the Gucci stencil itself (from itacakes.com, a cake-decorating supply company that carries nearly every designer logo stencil imaginable) went on in burnt umber, lined up carefully from a centered starting point and worked outward so both sides matched.
“I’m grateful for stenciling because it saved my rear end when I was painting some restaurants, some murals at restaurants, a Burger King in Kansas City, and I really didn’t have — I really didn’t have the talent for it, but I went and got stencils and just faked it till I made it.”
The trickiest part of the whole project wasn't the color — it was keeping the repeating pattern aligned so it didn't double up or drift off track, a step she said is worth taking slowly since any misalignment is much harder to fix after the fact.
Sealing, the center frame, and the finishing touches
Once the stenciled piece was sealed with Liquitex high gloss varnish, attention moved to the center: a small frame, painted gold, built to hold a "Merry Christmas" transfer. Transfers need a sealed surface underneath or they can pull up fresh paint — a lesson learned in real time when one transfer didn't want to release at all, and the stenciled piece underneath needed another protective coat before trying again.
From there, it came together with layers: grosgrain designer-print ribbon on both sides, a gold-painted frame in the center, mixed greenery and berries tucked in for interest (any faded or discolored berries got a quick dab of red paint to freshen them up), and gold dingle balls finishing it off. For anything headed outdoors — a wreath on a front door, a piece left out through the seasons — a few light coats of clear VHT engine enamel will protect it for years. "I'm telling you, the engine enamel is a miracle worker."
The reveal
Side by side with the plain glittered piece it started as, the transformation speaks for itself. "This is so stunning. I can't get over — it's from Dollar Tree... Dollar Tree does not have to be Dollar Tree." It's the kind of piece built for more than one use, too — hung on a front door, given as a hostess gift for a holiday dinner party, or dressed up even further as a playful gift topper. "This would be adorable on a big package for a 20-ish or 30-ish daughter... and inside is a real Gucci."
Supply List
Everything used for the designer ornament hanger, organized the way it comes together — prepping the base first, then the stencil work, then the finishing touches.
The Base
Wood ornament hangerFrom Dollar Tree, $1.25 — any plain wood ornament or hanger works
Sanding blockUsed to sand off the original glitter finish before priming
Stain-blocking bonding primerPrevents dark or bright colors underneath from bleeding through the new paint
Designer Stencil Finish
Designer Gucci stencilFrom itacakes.com — use discount code SISTERHOOD for a discount
Tan, burnt umber, and black craft paintStippled together to mimic a designer logo fabric background before stenciling
Liquitex high gloss varnishSeals the stenciled piece and gives it that signature shine
Center Frame
Small frameFrom Hobby Lobby, painted gold for the center "Merry Christmas" piece
Merry Christmas hot stamping transfer sheets Apply over a fully sealed surface so it releases cleanly
Ultimate glue (Aleene's or Crafters Pick)For attaching the frame and embellishments — dries fast, so work quickly
Finishing Touches
Grosgrain stripe designer ribbon Used on both sides to frame the stenciled design
Greenery, berries, and gold dingle ballsMixed varieties for interest — Hobby Lobby, Michael's, and thrift stores all work
VHT engine enamel, clearOptional — a few light coats weatherproof this for years if it's hung outdoors